Shadowrocket Setup Guide
Start with the details you already have, then add them, choose a mode, connect, and verify access. First establish a connection you can test again; then adjust rules and automation settings.
Before You Start / What You’ll Need
Get the App and Your Connection Details Ready
This guide covers first-time use on iPhone and iPad. For device compatibility and system requirements, refer to the App Store page. If you haven’t completed your purchase and installation, first read the App Store purchase and installation guide, then return here. Keep your original details before you begin. Before changing an existing configuration, make a copy so you don’t overwrite settings that work.
A subscription link is an address used to retrieve a server list. Individual server details usually include a protocol, address, port, and authentication fields. Although both are entered through similar menus, the steps differ. First identify which type of details you have, then follow the matching instructions below. Don’t paste a subscription URL into a server’s Host field or import individual server parameters as a configuration file.
All screenshots on this page are official App Store screenshots, included to help identify screens and fields. Items in the app may vary depending on your configuration, protocol, and interface language; follow what appears on your device. Complete the first four steps before setting up automation such as On Demand. While troubleshooting for the first time, keep your network conditions as consistent as possible.
01 / Add Server · Subscribe
Add Server: Add a Server or Import a Subscription
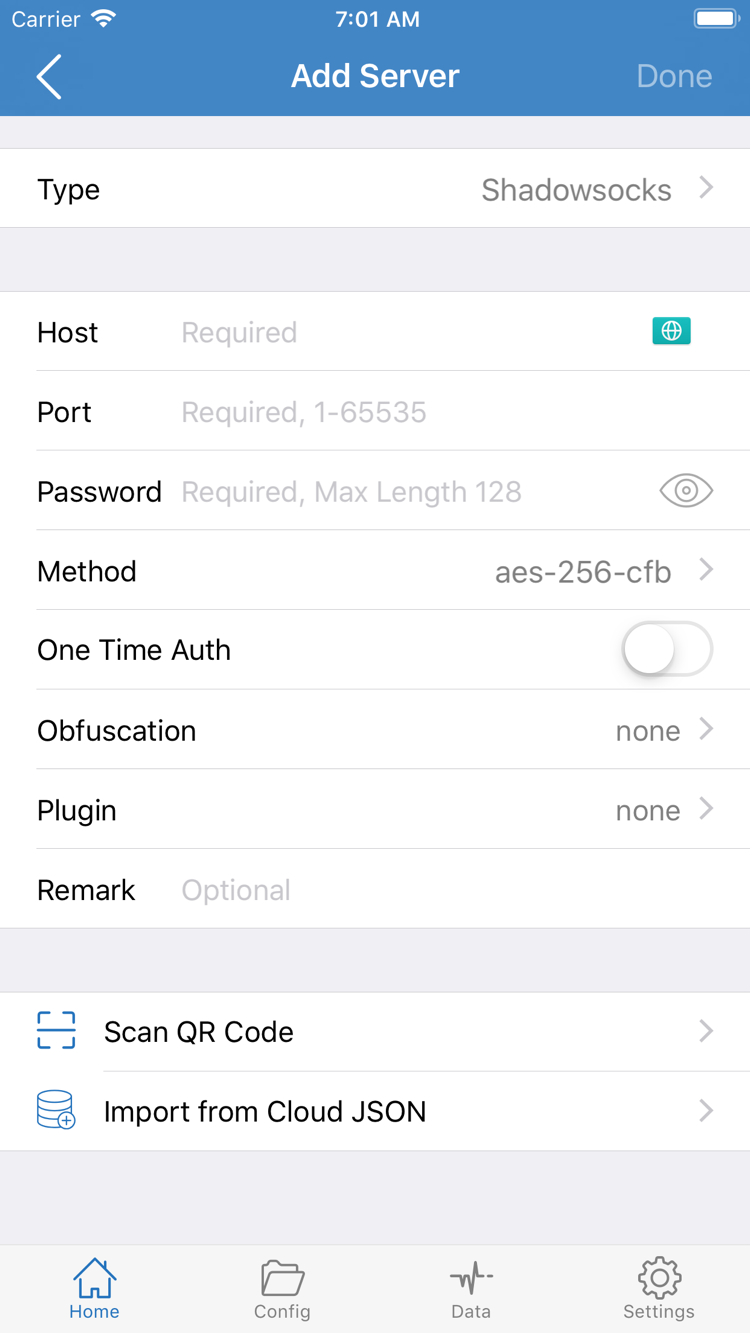
Open Shadowrocket and stay on Home. The SERVER section below lists your server entries. Tap Add Server to open the entry form. Choose just one import method: select Subscribe if you have a subscription link, or choose the matching protocol if you have complete details for one server. A QR code must also come from details you already have. Check the imported contents instead of relying on the displayed name to confirm the parameters are correct.
Have a Subscription Link? Choose Subscribe
- Open Add Server, tap Type, and select Subscribe from the list.
- Paste the full subscription link into the URL field. Check its beginning, end, and query parameters to make sure the copied link doesn’t include explanatory text or line breaks, and that no characters are missing.
- Save and return to Home. Wait for the subscription to finish retrieving its contents, then check whether entries appear in the SERVER section.
A subscription URL may contain access credentials. Don’t post the full link in a public discussion or screenshot. If no entries appear after saving, check for a retrieval error, then ask the provider of the original details to confirm that the link is valid and supports Shadowrocket. Renaming a subscription won’t fix an invalid URL. Adding the same subscription repeatedly can also make entries harder to identify, so check existing entries first.
To refresh a subscription later, update the existing entry and check whether the server list has changed. Updating syncs the list; it doesn’t fix every connection problem. If the server you had selected disappears after the update, select an existing entry again before continuing with the connection test.
Have Server Details? Check Each Type and Field
In Add Server, set Type first, then enter Host, Port, and the authentication fields required by that protocol. The official screenshot shows a form with Password and Method. Other Types have different fields, so don’t treat the screenshot as a universal template. Enter the server’s domain name or address in Host and use the Port in your original details; don’t guess or reuse a value from another entry.
For example, the Shadowsocks Method and Password must match the original details. For Types such as Trojan and VLESS, check TLS, SNI, and any other transport fields against your source details. Don’t turn off certificate verification just to work around an error. If you’re unsure what a protocol field means, read the quick reference before changing it.
If your details are in a QR code, use Scan QR Code. Import from Cloud JSON is a separate way to import structured data, not an alternative place to enter an ordinary subscription link. After saving, return to Home and confirm that a selectable entry appears under SERVER. This only adds your details; it doesn’t prove that the server works. Next, decide how requests should be handled.
02 / Global Routing · Config
Global Routing: Understand the Three Modes
Return to Home and tap Global Routing. This setting determines how requests are handled; it doesn’t add a server or replace server authentication. When getting started, distinguish Config, Proxy, and Direct to avoid mistaking a mode that doesn’t match your expectations for a failed import.
| Mode | How It Works and What to Check |
|---|---|
| Config | Handles requests according to the rules and policies in the active configuration. First check which file is selected on the Config tab. |
| Proxy | Handles requests through the proxy and is useful for temporarily checking the current proxy route. Actual behavior is still subject to the app’s and system’s handling scope. |
| Direct | Uses a direct connection. Don’t expect this mode to demonstrate proxy behavior. |
Before Using Config, Check the Active Configuration File
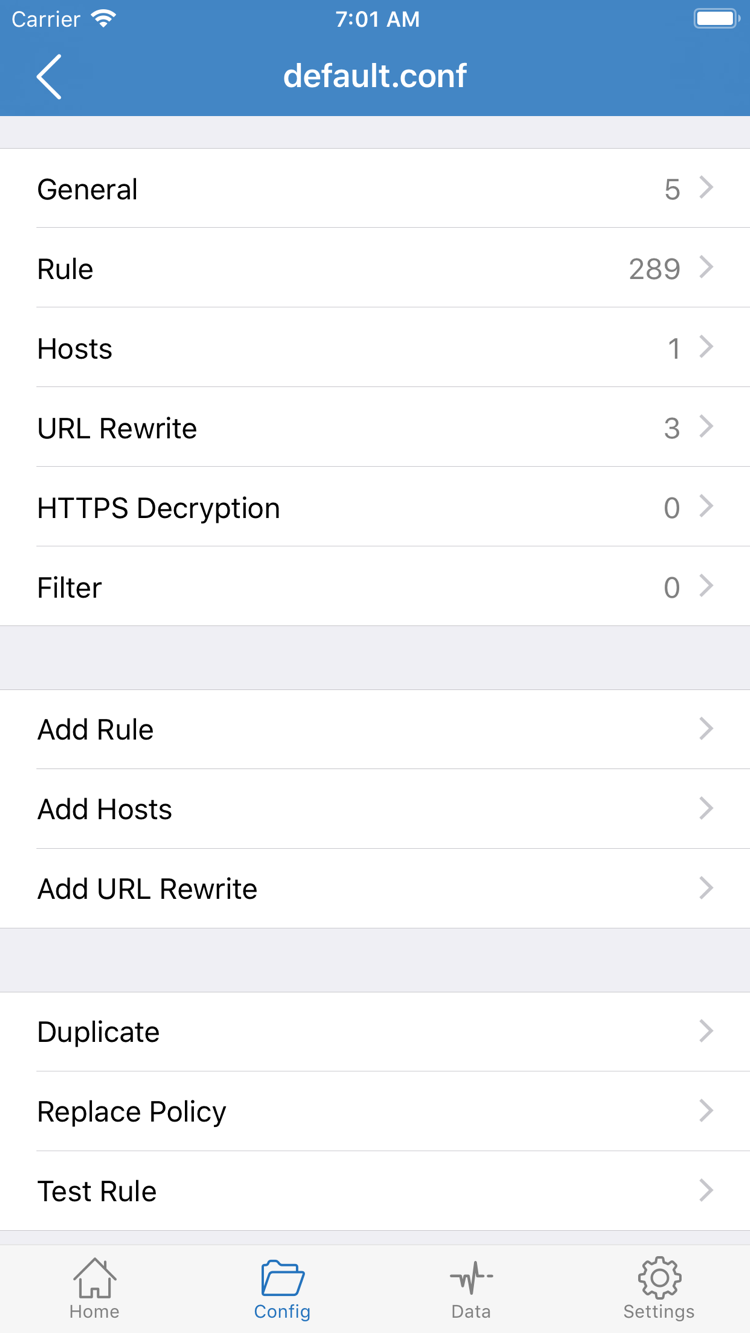
If you have a configuration file you want to use, open the Config tab at the bottom and confirm that the file is present and selected. Adding a file to the list doesn’t make it the active configuration. To inspect its contents, open that file in the editor and look for sections such as General and Rule. The official screenshot on the right shows configuration editing; it doesn’t mean you need to write each section by hand to get started.
Server subscriptions and rule configurations serve different purposes: the former mainly provide server entries, while the latter determine DNS, matching rules, and related behavior. Don’t assume that importing a subscription also gives you a complete set of routing rules. If you don’t have a configuration ready, use Proxy briefly to check connectivity to the server, then return to Config to organize your rules. Restore your intended mode when testing is complete.
Learn the Basic Rules Before Adding Complexity
The two lines below are examples for reading, not instructions to paste during your first connection. They show how the same connection can use different policies depending on the request’s destination. Check the policy in your existing configuration before editing any file.
DOMAIN-SUFFIX,example.com,PROXY
FINAL,DIRECT
The first line matches the domain suffix example.com and its subdomains, then uses PROXY. The second line, FINAL,DIRECT, uses DIRECT when none of the earlier rules match. example.com is only a syntax example. Rule order affects the result, so checking whether a site uses the proxy requires more than confirming the selected server: you also need to check which rule matches the request.
For now, remember the current mode and configuration filename. For full syntax details on General, Rule, Host, and URL Rewrite, read the rules and configuration reference. For now, return to Home, keep the selections you’ve confirmed, and get ready to connect.
03 / Home · SERVER
Home: Select a Server, Then Connect
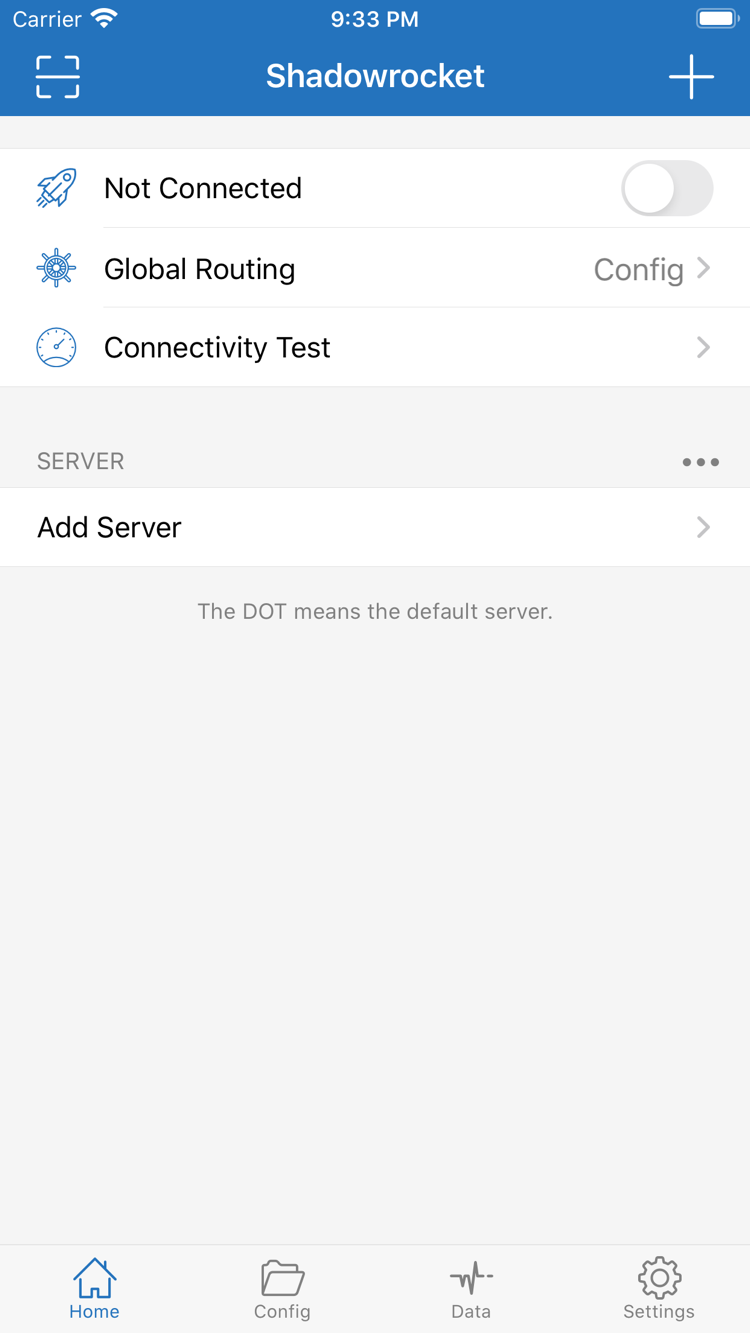
Return to Home and tap the server you want to use in the SERVER section. Confirm that the selected indicator is on the intended entry. Having an entry in the list doesn’t mean it’s the one currently in use. If your subscription has multiple entries, make your selection clear and avoid switching back and forth during testing so you can compare results.
- Check that Global Routing is set to the Config or Proxy mode you chose in the previous step. If you selected Config, confirm the active file on the Config tab again.
- Turn on the connection switch at the top of Home. When connecting for the first time, the system may ask to add a VPN configuration. Read the prompt, allow it, and complete any authentication required by your device.
- Return to Shadowrocket. Check whether the status at the top changes from Not Connected to a connected state, and make sure the switch stays on.
VPN configuration permission lets the app establish a system network connection. It won’t fill in missing server details; you still need your own existing connection information. If you tapped Cancel, return to Home, turn on the connection switch again, and follow the system prompt. Don’t delete all your servers or rebuild your configuration just because you canceled permission once.
If the switch turns off immediately, first confirm that system permission was granted. Then check whether another active VPN configuration is affecting the connection. Make only the necessary checks to your existing setup; don’t delete network settings in bulk. If the system still shows an error, disconnect, return to the app to check your details, and try connecting once more.
A switch that stays on only indicates that the connection process has reached a particular state. It doesn’t prove that a specific site is accessible or that every request is routed as expected. Keep the server, mode, and network unchanged for now, then cross-check using Connectivity Test and a browser.
04 / Connectivity Test
Verify the Connection: Check Test Results Separately from Actual Access
Tap Connectivity Test on Home and see whether it returns a result. This can provide a clue about connectivity, but it isn’t a complete test of every website, protocol, or rule. If the test fails, investigate further. Even if it returns a result, open a browser to check the sites you actually want to use.
- First, visit a page that normally works on your current network to confirm that your basic connection is still available. If the network itself is down, restore it before changing proxy settings.
- Next, visit a page that you expect to use the proxy under the current mode or rules. Refresh the page or send a new request; don’t rely on a previously cached page.
- If you’re using Config, check the rules to see whether the destination should use PROXY, DIRECT, or REJECT. If needed, review the request records available in the app and compare them with your expectations.
A page loading and a page going through the proxy are not the same thing. A configuration may intentionally send some requests DIRECT. If the destination matches a direct-connection rule, being able to access the page doesn’t prove that the proxy route works. Likewise, if a page only loads partially, its requests may match different rules for different domains. Identify the failing request before replacing all your rules.
To help distinguish a server problem from a rules problem, note the current mode, switch temporarily to Proxy, disconnect and reconnect, then visit the same destination. If Proxy works but Config doesn’t, first check the active configuration, DNS, and rules. If both fail, first check the server details and network conditions. This method can help narrow down the cause, but it doesn’t identify it definitively.
After testing, restore the Global Routing mode you need for everyday use and make another real-world request. If the problem persists, classify it by stage: details didn’t import, the connection won’t establish, everything fails after connecting, or only some destinations fail. Troubleshooting by stage is more effective than repeatedly toggling the connection.
05 / Settings · Diagnostics
Common Issues: Troubleshoot by Stage
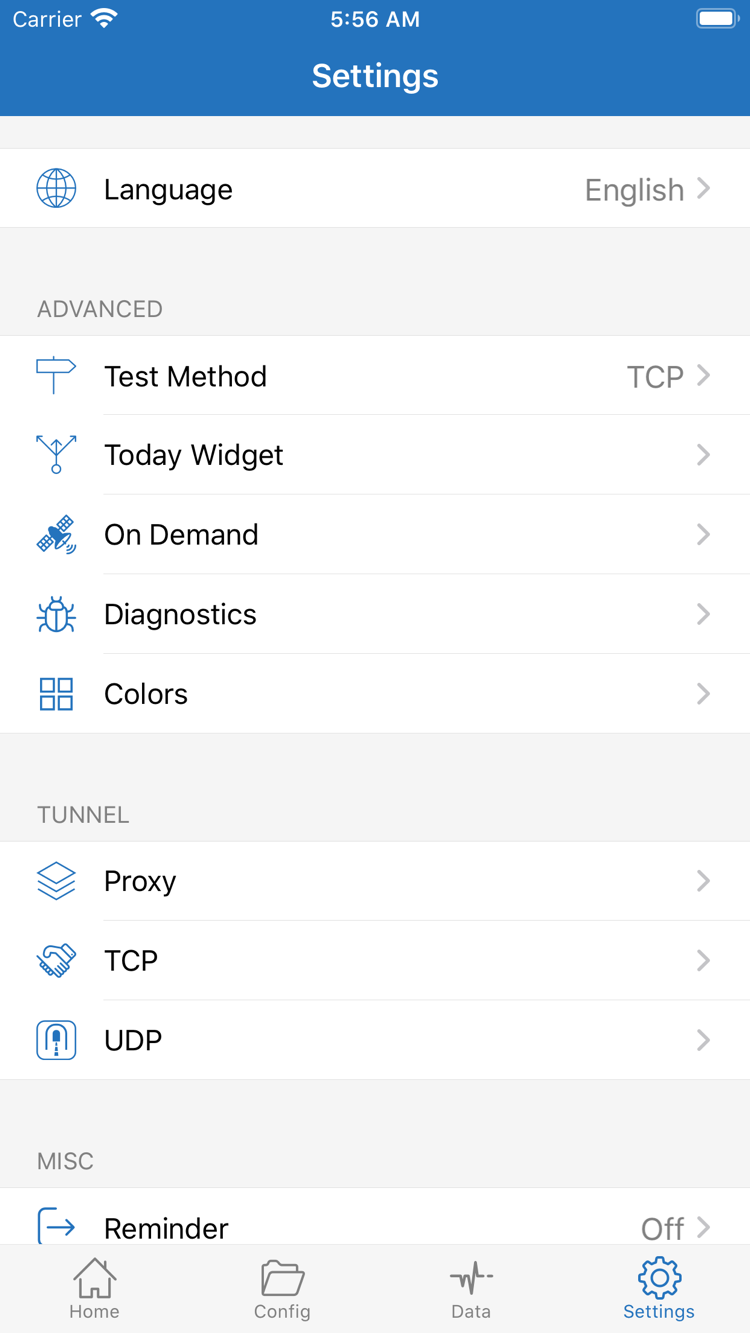
First, note which step failed, then open Settings to find the relevant diagnostic options. Test Method affects how tests run, so different methods may give different results. On Demand is for conditional connections; it isn’t required for your first manual connection. While troubleshooting for the first time, reproduce the issue using the manual switch to avoid confusion from automatic connections.
No Entries After Import: Check the Details and Link
If nothing new appears in Home’s SERVER section, return to the subscription entry and check that Type is set to Subscribe, the URL is complete, and there’s no error retrieving its contents. Confirm that your basic network connection works, and ask the provider of the original details to verify that they’re still valid. If you added a server manually, make sure you saved it rather than leaving the editor open. Fill in missing fields using your original details; don’t guess.
Connection Switch Won’t Stay On: Check System Permission First
Confirm that you completed the system prompt to add a VPN configuration and that the device isn’t waiting for verification, then return to Home and try again. If the device is subject to management policies, follow your organization’s requirements. This issue occurs while establishing the connection, so check the system state before changing Rule or URL Rewrite. Changing rules can’t replace system permission.
Connected but Nothing Loads: Check the Server and DNS
Reopen the selected server’s editor and compare Type, Host, Port, authentication fields, and TLS settings one by one. An unresolvable domain, temporarily unreachable server, or mismatched authentication can all make the connection unusable. If you use a subscription, update the existing entry once and confirm that the selected server is still listed. If the original details have changed, use the current valid details.
Next, check Global Routing and the DNS settings in Config. If you changed DNS manually, note what you changed, then compare against a setting known to work. Don’t add several unverified DNS addresses at once. DNS is only one part of the resolution process; changing it won’t fix an incorrect password, port, or server certificate.
Only Some Destinations Fail: Check the Rules and Test Scope
If Proxy works but Config doesn’t, first check the rule that matches the destination, rule order, and the final FINAL policy. A broad rule earlier in the list may prevent a more specific rule from matching. REJECT may also be intentional. Make the smallest change in a copy of the configuration, then send a new request to the destination to verify it. Don’t clear the original file.
If Connectivity Test and browser results differ, open Settings and check Test Method. Confirm that both tests used the same destination and network conditions. For further analysis, review Diagnostics, but treat its contents as clues and assess them alongside your server details and rules. Before sharing anything, remove the full subscription URL, Password, authentication parameters, and personally identifiable information. Keep only the observed error and necessary field names.
If you still can’t identify the cause, note the current mode, whether permission was granted, the test result, the failing destination, and the most recent change. Then see Troubleshooting. To inspect a configuration line by line, read the rules reference. First preserve a setup you can test repeatedly, then add features one at a time to avoid introducing changes that affect one another.
Review the Setup / Keep a Testable Configuration
First-Time Setup Checklist
- The intended server is listed and selected on Home, and the original subscription or server details are safely stored.
- Global Routing is set to the intended mode. If you’re using Config, you’ve confirmed which file is active.
- System permission is granted, and you’ve checked both the connection status and actual access—not just the switch.
- Any temporary changes made during testing have been reverted, so you can compare future changes against the current working setup.
Once you’ve confirmed these four items, your initial setup is complete. If something changes later, start by checking what changed most recently: whether the subscription was updated, the selected server changed, Config was switched, or network conditions differ. The rules reference and quick reference cover rule syntax and configuration concepts; you don’t need to learn everything before your first use.